Understanding Headless Implementation: The Future of Web Development
Content:
- What is Headless Architecture?
- Why Headless? Critical Benefits of Headless Content Management System Implementation
- Headless vs. Traditional Architecture
- Strapi and Next.js: A Perfect Pairing for Headless Web Development
- Conclusion: Empower Your Business with Headless Web Development
The world of web development is rapidly shifting towards a more flexible and modular approach called headless architecture. In this article, we’ll dive deep into what headless implementation is and how technologies like Strapi (a leading headless CMS) paired with Next.js can create robust, scalable, and dynamic websites for modern businesses.
This guide is perfect for those who are either planning to adopt a headless website architecture or want to understand more about the benefits and use cases of this revolutionary approach.
Headless implementation refers to the separation of a website’s backend from its front end. In a traditional CMS, such as WordPress, the backend (where you create content) and the frontend (what users see) are tightly coupled. This means that the content, design, and functionality are inherently intertwined, which can make maintenance, scaling, and updates cumbersome.
In contrast, a headless CMS like Strapi decouples content from the frontend presentation, streamlining the development process. This enables businesses to quickly adapt to market changes and enhance user experience by creating more engaging interfaces without the need for complete backend overhauls. This separation allows for greater flexibility, scalability, and performance.
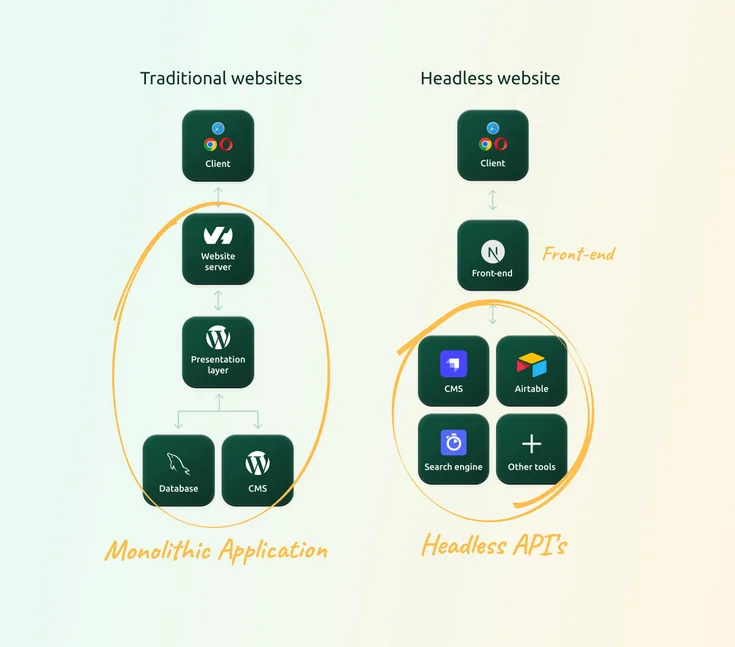
A headless solution can be visualized like this:
- Backend (Headless CMS/APIs): The system where content is created, managed, and stored. Strapi is an excellent choice here.
- API Layer: The bridge connecting the backend with the front end. Strapi provides a headless API architecture that serves content via REST or GraphQL APIs.
- Frontend: The presentation layer that users interact with. With Strapi, you can use modern frameworks like Next.js for the front end, ensuring a fast and highly responsive user experience.
What is Headless Architecture?
Definition and Explanation
Headless architecture is a modern software development approach that decouples the frontend (user interface) from the backend (business logic) of a website or application. This separation allows developers to create unique and tailored user experiences without being constrained by the limitations of traditional monolithic architectures. By using a headless content management system (CMS), businesses can manage and deliver content more efficiently, providing a seamless integration between the backend and multiple frontend channels.
How Headless Architecture Works
In a headless architecture, the frontend and backend layers operate independently. The frontend is responsible for rendering the user interface, while the backend handles business logic, data storage, and content management. This separation enables developers to use different technologies and frameworks for each layer, allowing for faster development and deployment of new features and updates. For instance, a headless CMS can serve content via APIs to various frontend frameworks like React, Vue, or Angular, ensuring a consistent and responsive user experience across multiple channels.
Why Headless? Critical Benefits of Headless Content Management System Implementation
- Flexibility: A headless website allows developers to choose different technologies to build the front end, such as Next.js, React, Vue, or Angular. This results in a highly customizable user interface tailored to your business’s specific needs.
- Scalability: Since the backend is decoupled, you can scale both your content and the frontend independently, which is ideal for businesses experiencing growth or seasonal traffic spikes.
- Omni-Channel Delivery: Content managed in a headless CMS can be delivered to multiple channels through APIs, such as mobile apps, digital signage, or even IoT devices, allowing for a cohesive brand experience.
- Future-Proofing: By separating the frontend from the backend, changes can be implemented more easily, allowing businesses to adapt to new technologies without overhauling their entire system.
- Initial Learning Curve: While headless architecture offers numerous benefits, there may be an initial learning curve for developers and designers as they adapt to new processes and technologies.
Headless vs. Traditional Architecture
Comparison of Headless and Monolithic Architecture
Headless architecture significantly differs from traditional monolithic architecture, where the frontend and backend are tightly coupled and inseparable. In a monolithic setup, any change to the frontend often necessitates corresponding changes to the backend, making it challenging to scale and adapt to evolving business needs. Conversely, headless architecture offers a more flexible and scalable approach, allowing businesses to modify the frontend or backend independently without affecting the other layer.
Headless architecture provides several advantages over traditional monolithic architecture, including:
- Greater Flexibility and Customization: Developers can choose the best tools and technologies for each layer, creating custom user interfaces that meet specific business requirements.
- Faster Development and Deployment: Independent layers mean that updates and new features can be rolled out more quickly, without the need for extensive backend changes.
- Improved Scalability and Performance: Each layer can be scaled independently, ensuring optimal performance even during high traffic periods.
- Enhanced Security and Reliability: Decoupling the layers can lead to better security practices and more robust systems.
- Better Support for Omnichannel Experiences: Content can be delivered seamlessly across multiple channels, such as websites, mobile apps, and IoT devices, providing a cohesive brand experience.
However, headless architecture also presents some challenges:
- Increased Complexity and Expertise Required: Managing separate layers can be more complex and may require specialized knowledge.
- Higher Upfront Costs and Investment: Initial setup and integration can be more expensive compared to traditional systems.
- Potential for Integration Issues and Compatibility Problems: Ensuring seamless integration between the frontend and backend can be challenging.
Overall, headless architecture is a powerful approach for building modern web applications and websites, offering greater flexibility, scalability, and customization than traditional monolithic architecture. By understanding headless design systems and leveraging the right tools, businesses can create dynamic and engaging user experiences that meet the demands of today’s digital landscape.
Strapi and Next.js: A Perfect Pairing for Headless Web Development
As a development agency focused on Strapi implementations, we love the combination of Strapi and Next.js for headless web development. Here’s why this pairing is ideal:
- Strapi is an open-source headless CMS that provides an intuitive UI for content managers and developers alike. It allows easy customization and extension, making it highly adaptable to specific business needs. Additionally, Strapi can be expanded with new modules in any way - so developers can easily extend the capabilities of this CMS.
- Next.js is a robust React-based framework that provides server-side rendering and static site generation, resulting in fast, SEO-friendly websites.
A headless commerce platform fits seamlessly into the broader composable commerce strategy in the ecommerce industry. By decoupling the presentation layer from the commerce engine, a headless commerce platform allows for faster implementation and seamless operation through API integration. This decoupled nature enables businesses to innovate and adapt quickly, providing a more flexible and scalable solution.
How to Build a Headless Website with Strapi and Next.js
In this step-by-step example, we’ll show you how to set up a headless site using Strapi and Next.js.
Using a headless design system can foster collaboration among teams, leverage automation, and improve documentation practices.
Step 1: Install and Set Up Strapi
Start by installing Strapi locally or through a hosting provider like DigitalOcean or AWS.
- Install Node.js (if not already installed. Recommended: v20)
- Use the following commands to create a new Strapi project:
npx create-strapi-app@latest
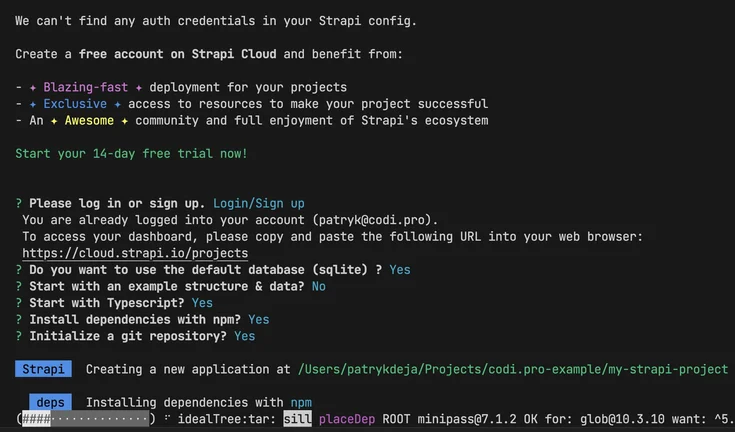
- Then start Strapi:
npm run develop
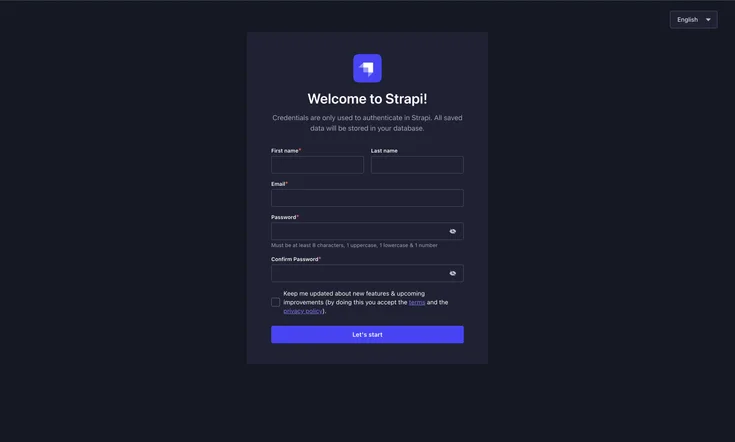
- Once Strapi is running, you'll have a content management panel accessible at http://localhost:1337/admin, where you can create your content types, fields, and relationships.
Step 2: Set Up Content Types in Strapi
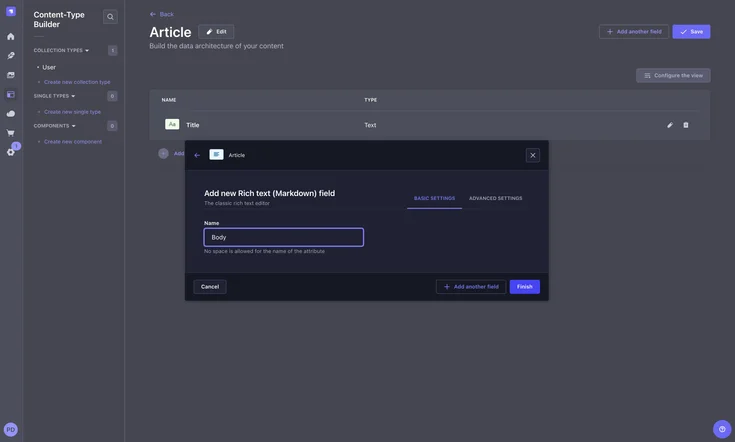
In Strapi, create the necessary content types for your website, such as articles, pages, or products. You can use the visual builder to define the structure of your content types.
For example, if you’re creating a blog, you might have the following fields:
- Title (Text)
- Body (Rich Text)
- PublishedDate (Date)
- CoverImage (Media)
By breaking down the UI into reusable components, you can streamline the development process and ensure consistency across multiple projects. This component-based architecture is crucial for implementing a headless design system.
Step 3: Seamless Integration of Next.js with Strapi
Create Strapi credentials to get Articles:
Navigate to the Settings tab and select API Tokens. In the top-right corner, click the "Create new API Token" button. Fill out the form with your desired configuration settings. After clicking the Save button, you'll receive a token that will be required for the next steps. Make sure to securely store this token as it won't be displayed again.
Create a Next.js Project:
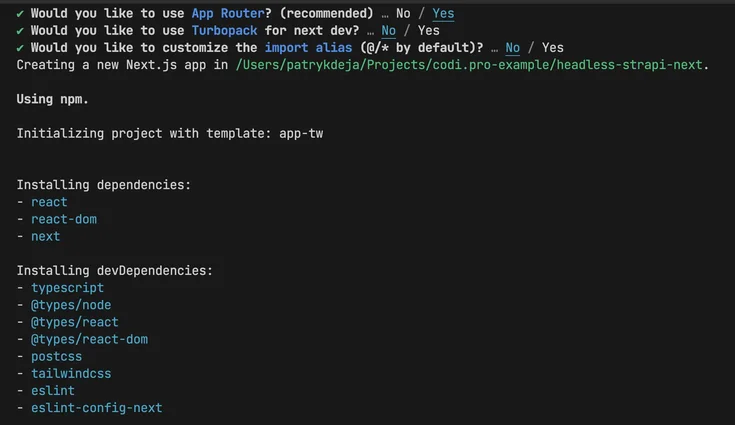
Install Next.js by following the CLI prompts in your terminal.
npx create-next-app headless-strapi-next
Create a service to fetch data from the Strapi backend:
// app/services/strapi.ts
// Define the structure of a Strapi article response
type StrapiArticle = {
  id: string;
  Title: string; // Title of the article (from Strapi response)
  Body: string; // Body content of the article (from Strapi response)
  CoverImage: {
    url: string; // URL of the cover image
    width: number; // Width of the cover image
    height: number; // Height of the cover image
  };
};

// Define the structure of a local article object
type Article = {
  id: string;
  title: string; // Title of the article (mapped from Strapi response)
  body: string; // Body content of the article (mapped from Strapi response)
  image: {
    url: string; // URL of the cover image
    width: number; // Width of the cover image
    height: number; // Height of the cover image
  };
};

// Type definition for a function that retrieves articles from Strapi and returns a Promise with an array of articles
type GetStrapiArticles = () => Promise<Article[]>;

// Type definition for a function that maps a Strapi article response to the local Article structure
type MapStrapiResponse = (articles: StrapiArticle[]) => Article[];

// Function to map Strapi articles to local articles
const mapStrapiResponse: MapStrapiResponse = (articles) => {
  return articles.map((article) => {
    return {
      id: article.id,
      title: article.Title, // Map Title to title
      body: article.Body, // Map Body to body
      image: {
        url: `${process.env.NEXT_PUBLIC_STRAPI_BASE_URL}${article.CoverImage.url}`, // Map CoverImage URL
        width: article.CoverImage.width, // Map CoverImage width
        height: article.CoverImage.height, // Map CoverImage height
      },
    };
  });
};

// Function to fetch articles from the Strapi API
const getStrapiArticles: GetStrapiArticles = async () => {
  // Fetch articles from Strapi with the CoverImage populated
  const res = await fetch(
    `${process.env.NEXT_PUBLIC_STRAPI_BASE_URL}/articles?populate=CoverImage`,
    {
      cache: "force-cache", // Use cache to improve performance
      headers: {
        "Content-Type": "application/json",
        Authorization: `Bearer ${process.env.NEXT_PUBLIC_STRAPI_API_KEY}`, // Use authorization token for API access
      },
    }
  );

  const articles = await res.json(); // Parse response JSON

  return mapStrapiResponse(articles.data); // Map Strapi response to local Article structure and return
};

export { getStrapiArticles };
We've added two environment variables to the code: NEXT_PUBLIC_STRAPI_API_KEY and NEXT_PUBLIC_STRAPI_BASE_URL. Now you need to create a .env file with these environment variables.
// .env
NEXT_PUBLIC_STRAPI_BASE_URL="http://localhost:1337/api"
NEXT_PUBLIC_STRAPI_API_KEY="YOUR_API_KEY"
Important security note: Never commit environment variables to your repository. Keep them in a secure location and add .env to your .gitignore file. Consider using a secure secret management system for production environments.
Step 4: Display Data on Next.js Pages with Custom User Interfaces
Now that we have our headless implementation set up, let’s create a component to display our Strapi content in Next.js. This example demonstrates a clean headless CMS architecture where the frontend is completely decoupled from the backend. Traditional design systems tie specific visual attributes to components, which restricts flexibility and adaptability, whereas headless systems focus on core design elements.
Add the following code to your page component to fetch and display articles from Strapi:
// app/page.tsx
import Image from "next/image";
import { getStrapiArticles } from "./services/strapi";

export default async function Home() {
  const articles = await getStrapiArticles();

  return (
    <div className="max-w-4xl mx-auto">
      <h1 className="text-3xl font-bold mb-6">Blog Articles</h1>
      <div className="space-y-6">
        {articles.map((article) => (
          <div
            className="bg-gray-200 p-6 rounded-lg shadow-md"
            key={article.id}
          >
            <h2 className="text-gray-900 text-2xl font-semibold mb-2">
              {article.title}
            </h2>
            <p className="text-gray-700">{article.body}</p>
            <Image
              src={article.image.url}
              width={article.image.width}
              height={article.image.height}
              alt={article.title}
              className="mt-4"
            />
          </div>
        ))}
      </div>
    </div>
  );
}
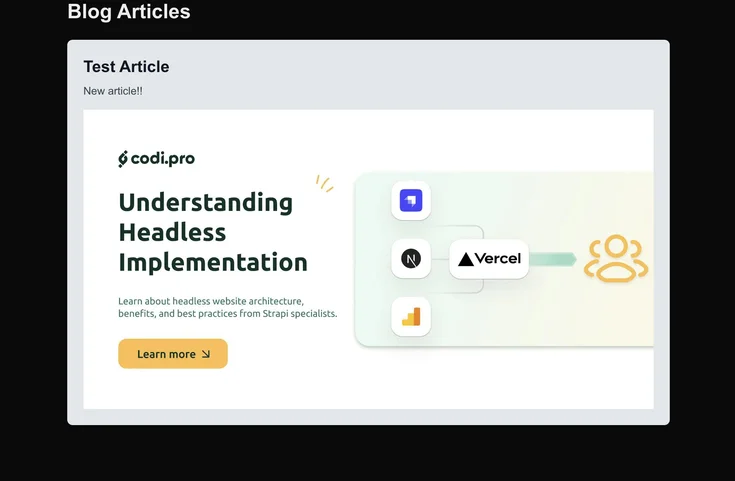
This component fetches articles using the getStrapiArticles service and renders them in a responsive layout with Tailwind CSS styling. Each article displays its title, body content, and associated image using Next.js’s optimized Image component.
Conclusion: Empower Your Business with Headless Web Development
A headless CMS like Strapi combined with a modern frontend framework such as Next.js (or Astro) is a powerful way to create fast, scalable, and engaging websites. This headless website architecture gives businesses the flexibility to deliver content across multiple channels while also benefiting from improved SEO, developer experience, and future-proofing capabilities.
If you're looking for an experienced team to implement headless web development using Strapi and Next.js, our agency specializes in creating custom, performant websites that meet your business goals.
Contact us today to learn more about how a headless solution can benefit your online presence.