The Ultimate Guide to Getting Started with Strapi API

Content:
In today’s web development landscape, APIs are essential for connecting services and powering digital experiences. Strapi API is a powerful, flexible solution that makes managing and delivering content straightforward. Whether you’re a seasoned developer or exploring APIs for the first time, understanding how to set up and use Strapi API can unlock significant potential for your projects. This guide will walk you through the essentials of Strapi, setting you up to streamline your development process.
Introduction to Strapi API
What is Strapi API?
Strapi API is an open-source headless CMS built with JavaScript, allowing developers to create and manage content with a customizable API. By decoupling backend and frontend, Strapi gives developers the flexibility to work with any framework—React, Next.js, Astro, or plain HTML. This adaptability makes Strapi ideal for projects that need a robust content management system. With a user-friendly interface and extensive features, Strapi simplifies content management, integrates well with other services, and enhances development workflows.
Benefits of Using Strapi API
Strapi’s flexibility and customization options stand out. It supports various databases, such as MongoDB, PostgreSQL, MySQL, and SQLite, so you can pick the best fit for your project. Strapi’s plugin-friendly architecture lets developers extend functionality, while the intuitive admin panel ensures even non-technical users can manage content. Strapi scales effortlessly for projects of all sizes, offers strong authentication and authorization options, and simplifies development by integrating seamlessly with other services.
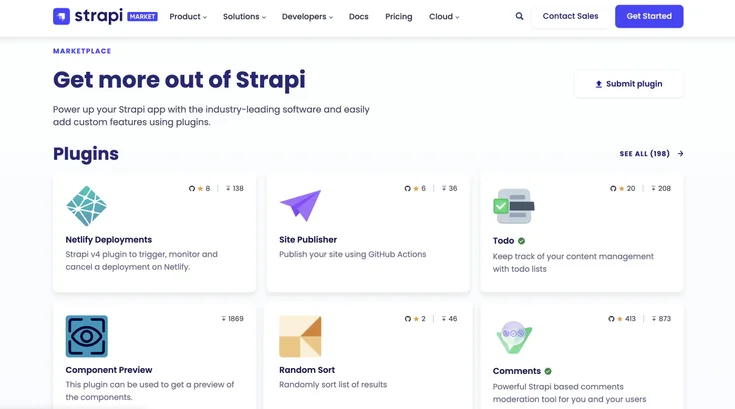
Strapi’s plugin-friendly architecture allows developers to extend its core functionality with a wide variety of integrations, making it versatile for many project needs. Some popular plugins include:
- Algolia: For powerful, lightning-fast search capabilities. Algolia integrates with Strapi to enable advanced search functionality, making content easily searchable and accessible.
- HubSpot: Connect Strapi with HubSpot for streamlined CRM management. This integration is ideal for marketing and sales teams, allowing them to capture leads and track customer interactions directly from your content management system.
- LottieFiles: Easily add animated graphics and Lottie animations to your project. LottieFiles’ integration with Strapi allows you to manage and display engaging animations seamlessly on your frontend.
- Elasticsearch: Enhance search precision and performance with Elasticsearch, a powerful search engine. Integrating Elasticsearch with Strapi enables real-time search and indexing for large-scale projects that require fast, accurate results.
These plugins, along with Strapi’s existing flexibility and robust architecture, make it adaptable to various use cases, from e-commerce to content-rich websites, ensuring that teams have the tools they need to meet project-specific requirements.

Key Features of Strapi
Strapi offers a powerful suite of features that makes it an attractive choice for developers:
- Headless architecture: The separation of frontend and backend gives developers complete control over how content is consumed and displayed.
- GraphQL support: Built-in support for GraphQL enables efficient data querying, allowing you to fetch precisely what’s needed.
- Plugin system: Easily add features like email, file uploads, and more.
- Role-Based access control (RBAC): Manage permissions securely with granular control over user roles.
- Auto-Generated RESTful API: Strapi automatically creates RESTful endpoints based on content types, expediting development.
- Customizable admin panel: The intuitive interface enables both developers and content creators to manage content effortlessly.
These features make Strapi a productivity-boosting, developer-friendly CMS.
Setting Up Strapi API
Installation Process
Installing Strapi is straightforward. First, make sure Node.js and npm are installed, as they are essential for Strapi. Open your terminal and enter:
npx create-strapi-app my-project --quickstart
This command creates a new project named “my-project” using SQLite as the default database. The --quickstart flag simplifies setup by automating configurations. Once installed, go to http://localhost:1337/admin in your browser, where you’ll create an admin account and access the Strapi dashboard.
Basic Configuration
Once Strapi is running, customize the settings to match your project’s needs. In the config folder, you can adjust database connections, server configurations, and middleware settings. For instance, to switch from SQLite to PostgreSQL, update the database.js file with your credentials. Adjust security.js to configure security headers, and add custom middleware in middlewares.js. Strapi’s configuration files are well-documented, making it easy to tailor the API for performance, security, and functionality.
Creating Your First Project
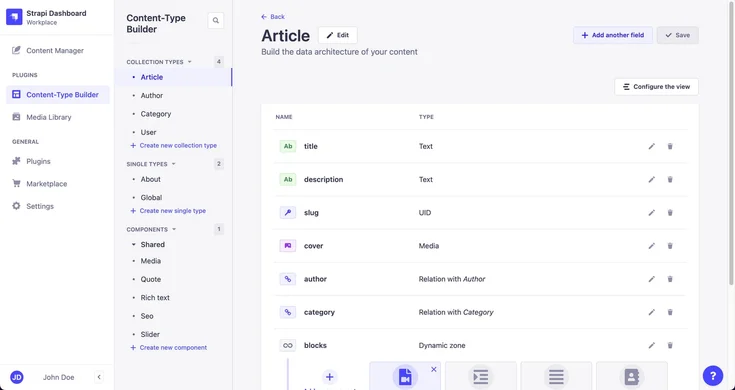
Creating your first project with Strapi API is an exciting step. Begin by defining your content types, which serve as the backbone of your application. Navigate to the Strapi admin panel and click on the "Content Types Builder" plugin. Here, you can create new content types by specifying fields such as text, number, date, and relations to other content types. For instance, if you're building a blog, you might create content types for "Post" and "Author". Once your content types are defined, you can start adding entries. Go to the "Content Manager" section, select the content type, and click on "Add New". Fill in the required fields and save your entry. Strapi automatically generates endpoints for your content types, allowing you to fetch and manipulate data via the API. This streamlined process makes it easy to get your project off the ground and start building rich, dynamic applications.
Building Your First API with Strapi
Defining Content Types
Content types are essential building blocks in Strapi, defining how data is structured. In the Strapi dashboard, go to the “Content Types Builder” to create new content types, such as “Article” or “Author.” Each content type can include various fields—text, numbers, dates, or relationships with other content types. Once saved, Strapi automatically generates API endpoints for each type, allowing for easy data interaction.
Adding Content Entries
Once content types are created, adding entries is simple. Go to “Content Manager,” select your content type, and click “Add New.” Fill in the fields and save your entry. For example, in a blog project, you might create entries for “Post” or “Author.” These entries are now accessible through the Strapi API, allowing you to fetch and manipulate data programmatically.

Creating Endpoints
Creating endpoints with Strapi API is a seamless process that happens automatically when you define your content types. Each content type you create generates a set of RESTful endpoints, including GET, POST, PUT, and DELETE methods. These endpoints allow you to interact with your data through standard HTTP requests. To view the available endpoints, navigate to the "API" section in the Strapi admin panel. For example, if you defined a content type named "Article", you can access the endpoint at /articles. You can fetch all articles using a GET request to /articles, or retrieve a specific article by adding its ID, such as /articles/1. Strapi also supports GraphQL, enabling more efficient data queries. This automatic endpoint creation simplifies the development process, allowing you to focus on building your application's frontend while Strapi handles the backend logic.
Testing Your API
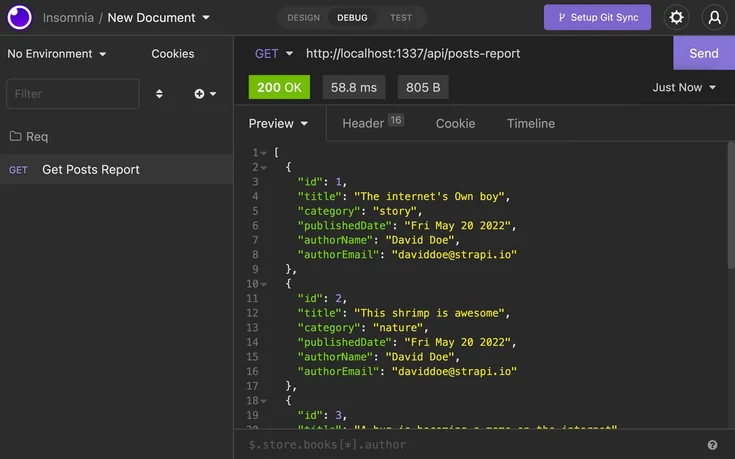
Testing your Strapi API is crucial to ensure it functions as expected. You can start by using tools like Postman or Insomnia to make HTTP requests to your API endpoints. These tools allow you to send GET, POST, PUT, and DELETE requests and view the responses. For instance, to test fetching all entries of a content type, send a GET request to the corresponding endpoint, such as /articles. Observe the response to check if it returns the expected data. Similarly, you can test creating an entry by sending a POST request with the required data payload. Strapi's built-in API documentation, accessible via the admin panel's "Documentation" plugin, provides a comprehensive overview of available endpoints and their parameters. Additionally, you can write automated tests using JavaScript testing frameworks like Jest to ensure your API remains robust as it evolves. Thorough testing helps identify and resolve issues early, ensuring a seamless user experience.

Advanced Strapi API Features
Authentication and Permissions
Strapi provides secure authentication options, using JWT (JSON Web Tokens) to authenticate users and Role-Based Access Control (RBAC) to manage permissions. In the “Roles & Permissions” section, you can set up roles like Admin, Editor, or Author, each with specific access rights. For more flexibility, Strapi supports external authentication providers, such as Google and Facebook, allowing for easy integration of third-party authentication.
Integrating Plugins
Strapi’s plugin system allows you to expand its functionality with ease. In the admin panel’s “Marketplace,” browse and install plugins like email, file upload, and analytics. Strapi also supports custom plugins, giving developers the ability to create features tailored to unique project needs. This architecture makes Strapi highly adaptable, supporting everything from simple integrations to complex, project-specific extensions.
Customising the Admin Panel
Strapi’s admin panel, built with React, is highly customizable. Navigate to the /admin folder within your project directory to modify or add components, adjust branding, or change the layout. You can alter logos, color schemes, and even create custom fields to meet specific content needs. For even greater flexibility, custom plugins can be developed to add functionalities unique to your project.
Best Practices and Tips
Optimising Performance
Optimizing Strapi API’s performance ensures a smooth user experience. Start by selecting a database that matches your scalability requirements, like PostgreSQL for large datasets. Use caching strategies with tools like Redis to improve response times, and enable gzip compression to reduce payload sizes. Regularly monitor and profile the API with services like New Relic or Datadog to identify performance bottlenecks. Optimizing query efficiency and deploying Strapi with containers or serverless architectures can also enhance performance.
Securing Your API
Securing your Strapi API protects data integrity and restricts unauthorized access. Enable HTTPS to encrypt data transmission, and configure RBAC to control endpoint access based on user roles. Use strong JWTs for authentication, and consider multi-factor authentication for sensitive data. Store sensitive information, such as API keys, in environment variables rather than directly in source files, and monitor for any suspicious activity. Regularly updating dependencies also minimizes security risks.
Troubleshooting Common Issues
If you encounter issues, Strapi’s logs can often point to the root cause. For database connection problems, double-check configurations, and ensure that JWT settings are correctly configured for authentication issues. When endpoint behavior is unexpected, review content type definitions and permissions, as these settings can often resolve the problem. Additionally, clearing cache or restarting the server can fix unexpected behavior. Strapi’s documentation and community forums are valuable resources for resolving persistent issues.
Start building with Strapi API
Strapi API provides developers with the tools needed to build scalable, secure, and flexible applications. With its user-friendly admin panel, rich customization options, and support for modern frameworks, Strapi is a top choice for projects requiring a versatile CMS. From creating content types to customizing the admin panel, Strapi empowers both developers and content creators to streamline content management and enhance integration possibilities.
If you’re ready to take your project to the next level but need expert guidance, we’re here to help. Contact us for support with Strapi API setup, customization, and development, so you can create a seamless, tailored experience for your users.